I wanted to alter the relief before posting it on Shapeways, to demonstrate how one can push a 3D file. I thought about putting twists in the rigid "chocolate bar" shape; perhaps with the Scherk-Collins Sculpture Generator somehow (see video).
**********
Luis Portu in Mexico City made a 3D scene using the relief file, and saved in OBJ format (
April 28):

Then Luis Portu
animated the 3D file:

**********
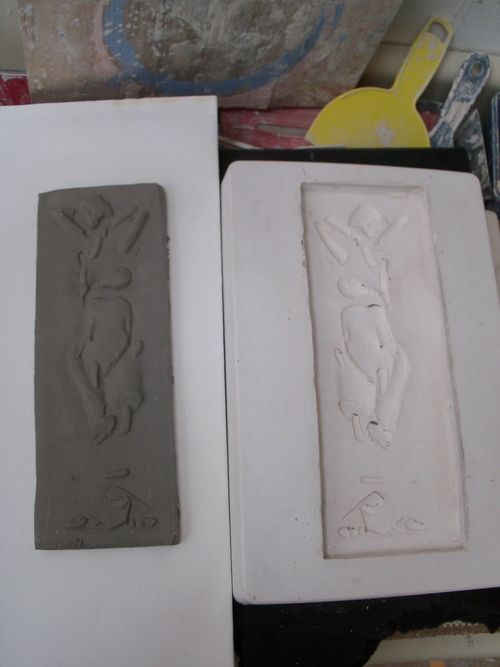
FabLabAbq in Albuquerque printed a mold of the relief image. They enlarged the 3D file to 12 inches, inverted the relief file to make a mold, and printed it on a
Zcorp printer. Since their Zcorp 3D printer cannot make objects as large as a foot, they printed the mold in 2 pieces, which they glued together with bondo. They then made a silicon rubber (
positive) from that mold. The objective is to make ceramic castings of the relief image (
April 5).
This is a picture of the mold in 2 pieces (
an illusionistic trick makes it look like a positive, but this is actually a photo of the mold):

Close up of the top mold piece:

After the Zcorp 3D printed the mold, the excess dust material has to be blown off (
as shown for the bottom half of the mold):

The 2 printed pieces were bonded together to make a full mold. Then FabLabAbq made a silicon rubber casting with
Smooth-On OOMOO25 (
no vacuum required):
 Eric
Eric and I then made a pour plaster mold from the silicon rubber positive, using a plastic box as a mother mold (
and for future storage). We brushed on a thin layer of dishwashing soap for mold release:

The finished plaster mold had a few bubbles in it. We have to dry it completely before making ceramic casting from it:

At
Mudfish in Albuquerque we cut clay and made a casting from the plaster press mold (
May 4):

After demolding (
clay needs to be dried and fired):

We also experimented by pressing the 3D relief print into wet clay; and by pressing a QR code (
made with embossing plastic) into clay, which probably will not work. However, the
QR code rubber stamp (
also made at Made to Order Stamp and Seal in Albuquerque) on white paper does work with a smart phone, and will take one to this blog entry:

Fired and glazed:

The fired and glazed imprint, made by pressing the 3D prototype into the clay:

Fired and glazed QR code:

**********
I "bombed"
Ace Barber Shop in Albuquerque with a QR sticker linking to this blog entry. However the sticker was "static cling " (no adhesive), the kind that peels off (and sticks to) a window cleanly, so Gabe wasn't too annoyed. I made the QR stickers at
3 Monkeys in Tempe (
May 27).

**********
I commissioned the
FabLab at the UNM Architecture department to print the relief in ABS plastic, using their
Dimension sst 1200es 3D printer (
May 2):

The 3D printout came out with stringy topography, which actually goes with my style (
apparently it was an artifact of the scan, and a little of the printing process). The object came out in 2 colors because they changed cartridges in the middle of the scan, but the slight color contrast still enhances the figure a bit.

**********
FabLabAbq (
on 2nd Street) computer milled the relief 4 feet high, in extruded polystyrene foam, so that we can cast the image in concrete (
May 3):

This is the finished mold:

This is that same mold, backlit by sunlight:

Test casting done in concrete at
Counter Intelligence in Albuquerque:

Final concrete casting (we need to find a place to install this):

Another test casting, with a layer of plastic between the styrofoam and the black concrete:
 John Barney
, landscape artist of Humus Mirabilis, helped us place the relief sculpture, which was then installed by
Counter Intelligence in front of the
3rd Street Arts center in Albuquerque (
June 9):

**********
I also commissioned a computer milled mold of this relief from
Acrymaquetas in Guadalajara. The idea is to then ship the 4 foot mold to Puerto Vallarta where someone will cast it in fiberglass. We would rather mill urethane foam, rather than the blue foam, because it is better for casting fiberglass
(April 18).
 Gonzalo
 received the mold in Puerto Vallarta, and cast it in what may be investment for bronze casting (
June 12):


**********
We placed our relief image in the Albuquerque Museum sculpture garden -- using "augmented reality." One ought to be able to see our sculpture on the screen of a smart phone, even though it does not exist in the real physical space. Moreover, one should also be able to walk around the "virtual sculpture," as the smart phone is inserting a 3D file into real space. This is all courtesy of the
Virtual Public Art Project (
June 2).
At the moment, the texture map apparently is not loading, so that our piece looks just like a white block. Also, the GPS altitude needs to be adjusted so that the relief sits on the ground, like a stela.
 Front view
 Side view
**********
A big thank you to Russ Riekeman for allowing us to install our relief sculpture in front of his
3rd Street Arts in Albuquerque (
June 26):
 Made to Order Stamp and Seal
 in Albuquerque made the plaque with the QR code, and EDCO made the base that sticks in the ground.
 Andres Orlowski
 took the final photos. More photos in the
June 26 blog entry.

I printed one of Andres' photographs on canvas at
Picture Perfect in Albuquerque, 3 feet high, and exhibited that canvas as a scroll at the
Industria Studios fundraiser in Tuscon (
July 9th).

Moises, from the
Sculpture Resource Center in Tucson, welded an iron mushroom sculpture to keep our relief company (
August 6):


 Close-up of computer milling:


 Front view
 Side view


